Redux 必备知识,第6部分:性能优化、正规化数据与响应式逻辑
- 如何用
createSelector创建记忆化的选择器函数 - 组件渲染性能优化的模式
- 如何用
createEntityAdapter来存储和更新正规化数据 - 如何用
createListenerMiddleware实现响应式逻辑
- 完成 第5部分 的学习以理解数据获取流程
简介
在 第5部分:异步逻辑与数据获取 中,我们学习了如何书写异步 thunk 来从服务器 API 获取数据,以及处理异步请求加载状态的模式。
在本节中,我们将探讨确保应用性能良好的优化模式,以及自动处理 store 中数据常见更新的技术。同时,我们还将学习如何编写响应已派发动作的响应式逻辑。
到目前为止,我们的大部分功能都围绕 posts 功能开发。现在我们将给应用添加几个新模块。添加完成后,我们将细看构建细节,讨论目前实现的不足之处及如何改进。
添加更多用户功能
添加用户页面
我们已从假 API 获取了用户列表,并且可以选择用户作为新增帖子的作者。但社交媒体应用需要查看特定用户页面,并浏览该用户发布的所有帖子。我们将添加一个展示所有用户列表的页面,再添加一个展示某用户所有帖子的页面。
先添加一个新的 <UsersList> 组件。它沿用以往模式,通过 useSelector 读取部分 store 数据,并对数组映射形成带链接的用户列表:
import { Link } from 'react-router-dom'

import { useAppSelector } from '@/app/hooks'

import { selectAllUsers } from './usersSlice'

export const UsersList = () => {
  const users = useAppSelector(selectAllUsers)

  const renderedUsers = users.map(user => (
    <li key={user.id}>
      <Link to={`/users/${user.id}`}>{user.name}</Link>
    </li>
  ))

  return (
    <section>
      <h2>Users</h2>

      <ul>{renderedUsers}</ul>
    </section>
  )
}
再添加一个与 <SinglePostPage> 类似的 <UserPage>,从路由中获取 userId 参数,然后渲染该用户的所有帖子列表。按照惯例,我们先在 postsSlice.ts 中添加一个 selectPostsByUser 选择器:
// 省略其它代码
export const selectPostById = (state: RootState, postId: string) =>
  state.posts.posts.find(post => post.id === postId)

export const selectPostsByUser = (state: RootState, userId: string) => {
  const allPosts = selectAllPosts(state)
  // ❌ 这看起来有问题!详见下文解释
  return allPosts.filter(post => post.user === userId)
}

export const selectPostsStatus = (state: RootState) => state.posts.status
export const selectPostsError = (state: RootState) => state.posts.error
import { Link, useParams } from 'react-router-dom'

import { useAppSelector } from '@/app/hooks'
import { selectPostsByUser } from '@/features/posts/postsSlice'

import { selectUserById } from './usersSlice'

export const UserPage = () => {
  const { userId } = useParams()

  const user = useAppSelector(state => selectUserById(state, userId!))

  const postsForUser = useAppSelector(state =>
    selectPostsByUser(state, userId!)
  )

  if (!user) {
    return (
      <section>
        <h2>User not found!</h2>
      </section>
    )
  }

  const postTitles = postsForUser.map(post => (
    <li key={post.id}>
      <Link to={`/posts/${post.id}`}>{post.title}</Link>
    </li>
  ))

  return (
    <section>
      <h2>{user.name}</h2>

      <ul>{postTitles}</ul>
    </section>
  )
}
请注意,我们在 selectPostsByUser 中使用了 allPosts.filter(),这其实是一个 错误 的写法! 稍后会说明原因。
我们在 usersSlice 中已有 selectAllUsers 和 selectUserById 选择器,组件中直接导入使用就行。
此前已有示例展示,我们可以先从一次 useSelector 读取数据或从 props 中获取数据,然后用这些数据辅助决定下一次 useSelector 读取何种 store 数据。
同往常一样,我们会在 <App> 中为这些组件添加路由:
          <Route path="/posts/:postId" element={<SinglePostPage />} />
          <Route path="/editPost/:postId" element={<EditPostForm />} />
          <Route path="/users" element={<UsersList />} />
          <Route path="/users/:userId" element={<UserPage />} />
还要在 <Navbar> 添加一个链接到 /users 的标签页,方便跳转到 <UsersList>:
export const Navbar = () => {
  // 省略其它逻辑

  navContent = (
    <div className="navContent">
      <div className="navLinks">
        <Link to="/posts">Posts</Link>
        <Link to="/users">Users</Link>
      </div>
      <div className="userDetails">
        <UserIcon size={32} />
        {user.name}
        <button className="button small" onClick={onLogoutClicked}>
          Log Out
        </button>
      </div>
    </div>
  )

  // 省略其它渲染
}
如此一来,我们就可以浏览每个用户页面,并看到该用户所有的帖子列表。
向服务器发送登录请求
目前 <LoginPage> 和 authSlice 仅派发客户端 Redux 操作来跟踪当前用户名。实际上,我们需要向服务器发送登录请求。就像对待帖子和用户的方式一样,我们把登录和登出处理改写成异步 thunk。
import { createSlice, createAsyncThunk } from '@reduxjs/toolkit'

import { client } from '@/api/client'

import type { RootState } from '@/app/store'

import { createAppAsyncThunk } from '@/app/withTypes'

interface AuthState {
  username: string | null
}

export const login = createAppAsyncThunk(
  'auth/login',
  async (username: string) => {
    await client.post('/fakeApi/login', { username })
    return username
  }
)

export const logout = createAppAsyncThunk('auth/logout', async () => {
  await client.post('/fakeApi/logout', {})
})

const initialState: AuthState = {
  // 注意:真实应用一般会有更复杂的认证状态,
  // 这里只用简单示例
  username: null
}

const authSlice = createSlice({
  name: 'auth',
  initialState,
  // 移除原 reducer 定义
  reducers: {},
  extraReducers: builder => {
    // 统一处理 thunk 的 action
    builder
      .addCase(login.fulfilled, (state, action) => {
        state.username = action.payload
      })
      .addCase(logout.fulfilled, state => {
        state.username = null
      })
  }
})

// 移除导出的普通 action

export default authSlice.reducer
同样,我们更新 <Navbar> 和 <LoginPage>,导入并派发新的 thunk 替代旧的 action 创建者:
import { Link } from 'react-router-dom'

import { useAppDispatch, useAppSelector } from '@/app/hooks'

import { logout } from '@/features/auth/authSlice'
import { selectCurrentUser } from '@/features/users/usersSlice'

import { UserIcon } from './UserIcon'

export const Navbar = () => {
  const dispatch = useAppDispatch()
  const user = useAppSelector(selectCurrentUser)

  const isLoggedIn = !!user

  let navContent: React.ReactNode = null

  if (isLoggedIn) {
    const onLogoutClicked = () => {
      dispatch(logout())
    }
import React from 'react'
import { useNavigate } from 'react-router-dom'

import { useAppDispatch, useAppSelector } from '@/app/hooks'
import { selectAllUsers } from '@/features/users/usersSlice'

import { login } from './authSlice'

// 省略类型定义

export const LoginPage = () => {
  const dispatch = useAppDispatch()
  const users = useAppSelector(selectAllUsers)
  const navigate = useNavigate()

  const handleSubmit = async (e: React.FormEvent<LoginPageFormElements>) => {
    e.preventDefault()

    const username = e.currentTarget.elements.username.value
    await dispatch(login(username))
    navigate('/posts')
  }
因为 postsSlice 使用了 userLoggedOut 辅助 action,我们修改其监听为 logout.fulfilled:
import { createAsyncThunk, createSlice, PayloadAction } from '@reduxjs/toolkit'
import { client } from '@/api/client'

import type { RootState } from '@/app/store'

// 改为从 authSlice 导入这个 thunk
import { logout } from '@/features/auth/authSlice'

// 省略类型定义及其他设置

const postsSlice = createSlice({
  name,
  initialState,
  reducers: {
    /* 略 */
  },
  extraReducers: builder => {
    builder
      // 监听 thunk 的 fulfilled 动作
      .addCase(logout.fulfilled, state => {
        // 用户登出时清空帖子列表
        return initialState
      })
    // 省略其他 case
  }
})
添加通知功能
社交媒体应用少不了弹出通知,告知有人发消息、评论或对帖子点赞。
真实应用中,客户端会持续和服务器通信,服务器一有消息就推送到客户端。这里示范的示例很小,我们模拟这个过程,添加按钮从假 API 获取若干通知条目。注意没有其他 真实 用户发送消息或操作,假 API 会针对每次请求返回随机生成的部分通知条目。(重点在展示如何用 Redux)
通知切片
这部分属于新功能模块,第一步是创建通知切片和一个异步 thunk 从 API 拉取通知。为了生成真实的通知条目,我们需要传递目前 state 中最新通知的时间戳,让假服务器只返回比它新的通知。
import { createSlice } from '@reduxjs/toolkit'

import { client } from '@/api/client'

import type { RootState } from '@/app/store'
import { createAppAsyncThunk } from '@/app/withTypes'

export interface ServerNotification {
  id: string
  date: string
  message: string
  user: string
}

export const fetchNotifications = createAppAsyncThunk(
  'notifications/fetchNotifications',
  async (_unused, thunkApi) => {
    const allNotifications = selectAllNotifications(thunkApi.getState())
    const [latestNotification] = allNotifications
    const latestTimestamp = latestNotification ? latestNotification.date : ''
    const response = await client.get<ServerNotification[]>(
      `/fakeApi/notifications?since=${latestTimestamp}`
    )
    return response.data
  }
)

const initialState: ServerNotification[] = []

const notificationsSlice = createSlice({
  name: 'notifications',
  initialState,
  reducers: {},
  extraReducers(builder) {
    builder.addCase(fetchNotifications.fulfilled, (state, action) => {
      state.push(...action.payload)
      // 最新通知排在前面
      state.sort((a, b) => b.date.localeCompare(a.date))
    })
  }
})

export default notificationsSlice.reducer

export const selectAllNotifications = (state: RootState) => state.notifications
同其它切片一样,将 notificationsReducer 导入并添加到 store.ts 的 configureStore() 配置中。
fetchNotifications 是一个异步 thunk,用于向服务器请求新通知列表。请求时我们包含了最新通知的时间戳,告诉服务器只返回更新的通知。
服务器返回数组,我们通过 state.push(...items) 批量插入,并调用 array.sort() 保证数组按时间倒序排列。(提醒:array.sort() 会直接修改原数组——这里只能这样写是因为用 createSlice 和 Immer 支持可变写法)
Thunk 参数
观察 fetchNotifications thunk 有一些新写法,花点时间说明一下 thunk 参数。
以前学过,向 thunk action creator 派发时可以传递参数,比方说 dispatch(addPost(newPost))。createAsyncThunk 只能接收且传入一个参数,这个参数即是 payload 回调的第一个。
如果没有传参,这个第一个参数就是 undefined。
回调的第二个参数是一个包含很多实用功能的 thunkAPI 对象,比如:
dispatch和getState:真实 Redux store 的 dispatch 和 getState 函数,在 thunk 中可以调用更多操作或获取最新 storeextra:创建 store 的中间件传入的「额外参数」,通常是封装好的 API 调用函数集合,方便 thunk 使用requestId:此 thunk 调用的唯一随机 ID,便于跟踪进度signal:可以取消正在执行请求的AbortController.signalrejectWithValue:可以定制 thunk 出错时 action 的返回值
(如果用手写 thunk 不用 createAsyncThunk,会分别传入 (dispatch, getState) 两个参数,而不是放在单个对象中)
更多详情及取消请求处理,参考 createAsyncThunk API 参考。
这次我们用到了 thunkApi(第二个参数),第一个参数并不使用,因此命名为 _unused。
我们从 store 中拿到通知数组,最新通知出现在数组开头。用 thunkApi.getState() 与 selectAllNotifications 选择器得到通知数组,再用数组解构获得最新通知。
添加通知列表组件
有了 notificationsSlice 后,就能做 <NotificationsList> 组件。它从 store 读取通知列表并格式化渲染,展示通知多久之前发出、是谁发送的。我们已有 <PostAuthor> 和 <TimeAgo> 组件能格式化显示,可重用其中 <PostAuthor>。不过 <PostAuthor> 默认带有 "by " 前缀,不适合这里显示通知,我们给它增加一个 showPrefix 属性,默认 true,在这里设为 false 不显示前缀。
interface PostAuthorProps {
  userId: string
  showPrefix?: boolean
}

export const PostAuthor = ({ userId, showPrefix = true }: PostAuthorProps) => {
  const author = useAppSelector(state => selectUserById(state, userId))

  return (
    <span>
      {showPrefix ? 'by ' : null}
      {author?.name ?? 'Unknown author'}
    </span>
  )
}
import { useAppSelector } from '@/app/hooks'

import { TimeAgo } from '@/components/TimeAgo'

import { PostAuthor } from '@/features/posts/PostAuthor'

import { selectAllNotifications } from './notificationsSlice'

export const NotificationsList = () => {
  const notifications = useAppSelector(selectAllNotifications)

  const renderedNotifications = notifications.map(notification => {
    return (
      <div key={notification.id} className="notification">
        <div>
          <b>
            <PostAuthor userId={notification.user} showPrefix={false} />
          </b>{' '}
          {notification.message}
        </div>
        <TimeAgo timestamp={notification.date} />
      </div>
    )
  })

  return (
    <section className="notificationsList">
      <h2>Notifications</h2>
      {renderedNotifications}
    </section>
  )
}
还要给 <Navbar> 添加「通知」页签和一个按钮用于刷新通知:
// 省略导入

import { logout } from '@/features/auth/authSlice'
import { fetchNotifications } from '@/features/notifications/notificationsSlice'
import { selectCurrentUser } from '@/features/users/usersSlice'

export const Navbar = () => {
  const dispatch = useAppDispatch()
  const user = useAppSelector(selectCurrentUser)

  const isLoggedIn = !!user

  let navContent: React.ReactNode = null

  if (isLoggedIn) {
    const onLogoutClicked = () => {
      dispatch(logout())
    }

    const fetchNewNotifications = () => {
      dispatch(fetchNotifications())
    }

    navContent = (
      <div className="navContent">
        <div className="navLinks">
          <Link to="/posts">Posts</Link>
          <Link to="/users">Users</Link>
          <Link to="/notifications">Notifications</Link>
          <button className="button small" onClick={fetchNewNotifications}>
            Refresh Notifications
          </button>
        </div>
        {/* 省略用户详情 */}
      </div>
    )
  }

  // 省略其余渲染
}
最后在 App.tsx 加入通知路由以支持跳转:
// 省略导入
import { NotificationsList } from './features/notifications/NotificationsList'

function App() {
  return (
    // 省略外层路由设置
    <Routes>
      <Route path="/posts" element={<PostsMainPage />} />
      <Route path="/posts/:postId" element={<SinglePostPage />} />
      <Route path="/editPost/:postId" element={<EditPostForm />} />
      <Route path="/users" element={<UsersList />} />
      <Route path="/users/:userId" element={<UserPage />} />
      <Route path="/notifications" element={<NotificationsList />} />
    </Routes>
  )
}
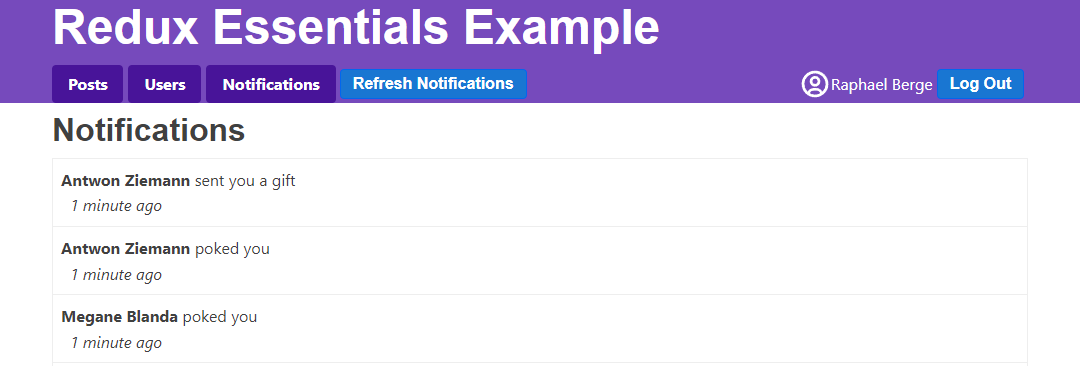
下面是当前「通知」标签页的样子:
显示新的通知
每点击一次「刷新通知」,列表就会增加一些通知条目。真实应用中,这种新通知可能会推送到用户查看其他页面时。我们可以模拟点击「刷新通知」,同时切换在 <PostsList> 或 <UserPage> 页签。
不过目前我们没看到新增通知数目,如果按钮一直被点击,可能会积累很多未读通知。我们添加逻辑跟踪通知是否被阅读,区分哪些是「新」的。这样就能在导航栏「通知」标签上显示未读数量徽章,并在列表中用不同样式标注新通知。
追踪通知状态
从假 API 返回的通知是 {id, date, message, user} 格式,「新」和「未读」概念仅存在客户端,因此重写 notificationsSlice:
先定义 ClientNotification 类型,继承自 ServerNotification 并新增两个字段,然后在接收到服务器通知时,默认给这两个字段赋值。
另外,添加 reducer,用来标记全部通知已读,并添加逻辑调整已有通知的「新」状态。
最后,定义一个选择器返回未读通知数量:
// 省略导入

export interface ServerNotification {
  id: string
  date: string
  message: string
  user: string
}

export interface ClientNotification extends ServerNotification {
  read: boolean
  isNew: boolean
}

// 省略 thunk

const initialState: ClientNotification[] = []

const notificationsSlice = createSlice({
  name: 'notifications',
  initialState,
  reducers: {
    allNotificationsRead(state) {
      state.forEach(notification => {
        notification.read = true
      })
    }
  },
  extraReducers(builder) {
    builder.addCase(fetchNotifications.fulfilled, (state, action) => {
      // 添加客户端元数据以追踪新的通知
      const notificationsWithMetadata: ClientNotification[] =
        action.payload.map(notification => ({
          ...notification,
          read: false,
          isNew: true
        }))

      state.forEach(notification => {
        // 已读通知不再被标记为新
        notification.isNew = !notification.read
      })

      state.push(...notificationsWithMetadata)
      // 按日期降序排序
      state.sort((a, b) => b.date.localeCompare(a.date))
    })
  }
})

export const { allNotificationsRead } = notificationsSlice.actions

export default notificationsSlice.reducer

export const selectUnreadNotificationsCount = (state: RootState) => {
  const allNotifications = selectAllNotifications(state)
  const unreadNotifications = allNotifications.filter(
    notification => !notification.read
  )
  return unreadNotifications.length
}
将通知标记为已读
我们希望 <NotificationsList> 组件渲染时,无论是点击标签页打开还是已有页面时刷新通知,都会派发 allNotificationsRead。
为避免数据闪烁,使用 useLayoutEffect 钩子来派发。同时为通知列表项添加额外 class,实现新通知高亮:
import { useLayoutEffect } from 'react'
import classnames from 'classnames'
import { useAppSelector, useAppDispatch } from '@/app/hooks'

import { TimeAgo } from '@/components/TimeAgo'

import { PostAuthor } from '@/features/posts/PostAuthor'

import {
  allNotificationsRead,
  selectAllNotifications
} from './notificationsSlice'

export const NotificationsList = () => {
  const dispatch = useAppDispatch()
  const notifications = useAppSelector(selectAllNotifications)

  useLayoutEffect(() => {
    dispatch(allNotificationsRead())
  })

  const renderedNotifications = notifications.map(notification => {
    const notificationClassname = classnames('notification', {
      new: notification.isNew
    })

    return (
      <div key={notification.id} className={notificationClassname}>
        <div>
          <b>
            <PostAuthor userId={notification.user} showPrefix={false} />
          </b>{' '}
          {notification.message}
        </div>
        <TimeAgo timestamp={notification.date} />
      </div>
    )
  })

  return (
    <section className="notificationsList">
      <h2>Notifications</h2>
      {renderedNotifications}
    </section>
  )
}
此实现有效,但表现稍意外。只要有新通知(切换标签页或触发刷新),会派发 两次 "notifications/allNotificationsRead"。
为何?
假设我们在 <PostsList> 时收到了通知,然后点击「通知」标签页。<NotificationsList> 挂载后,第一次 render 后的 useLayoutEffect 派发了 allNotificationsRead,对应 reducer 更新状态并返回新的 state.notifications 数组,迫使组件重渲染。
第二次渲染时,useLayoutEffect 再次运行,派发 allNotificationsRead,不过 reducer 这次没有修改状态,返回原状态,组件不会再重渲染。
虽可用组件挂载阶段派发和检测通知数组变化分开派发来避免,但对用户体验无影响,可以接受。
这里展示了 派发 action 不一定导致状态变化,纯粹由 reducers 决定是否更改状态是有效选择。
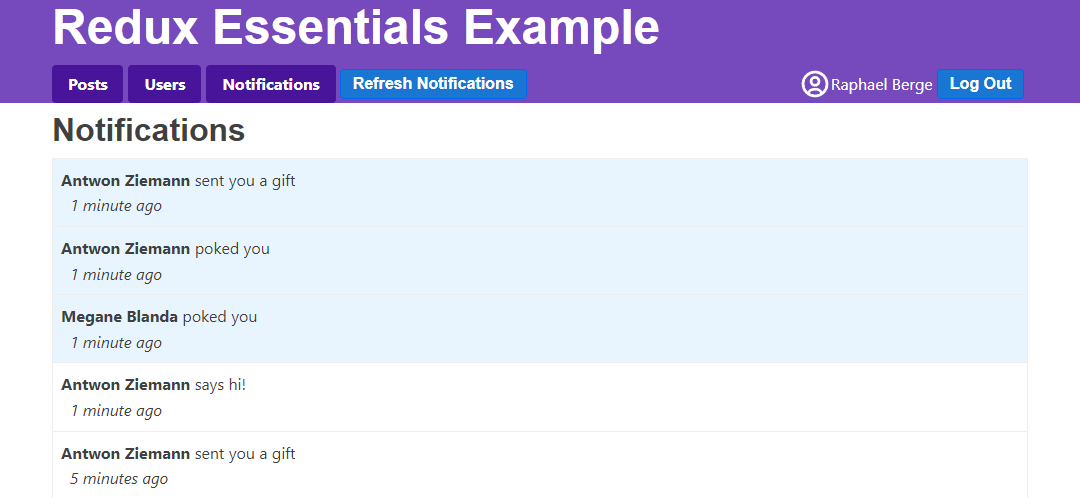
下面图示新增已读状态:
显示未读通知徽章
最后一步是在导航栏「通知」标签旁显示未读通知数量徽章,以便在其它界面时提醒:
// 省略其它导入

import {
  fetchNotifications,
  selectUnreadNotificationsCount
} from '@/features/notifications/notificationsSlice'

export const Navbar = () => {
  const dispatch = useAppDispatch()
  const username = useAppSelector(selectCurrentUsername)
  const user = useAppSelector(selectCurrentUser)

  const numUnreadNotifications = useAppSelector(selectUnreadNotificationsCount)


  const isLoggedIn = !!user

  let navContent: React.ReactNode = null

  if (isLoggedIn) {
    const onLogoutClicked = () => {
      dispatch(logout())
    }

    const fetchNewNotifications = () => {
      dispatch(fetchNotifications())
    }

    let unreadNotificationsBadge: React.ReactNode | undefined

    if (numUnreadNotifications > 0) {
      unreadNotificationsBadge = (
        <span className="badge">{numUnreadNotifications}</span>
      )
    }

    navContent = (
      <div className="navContent">
        <div className="navLinks">
          <Link to="/posts">Posts</Link>
          <Link to="/users">Users</Link>
          <Link to="/notifications">
            Notifications {unreadNotificationsBadge}
          </Link>
          <button className="button small" onClick={fetchNewNotifications}>
            Refresh Notifications
          </button>
        </div>
        {/* 省略按钮 */}
      </div>
    )
  }

  // 省略其它渲染
}
性能渲染优化
应用已经挺强大了,但组件的渲染时机和方式存在一些瑕疵。下面分析问题,聊聊优化策略。
调查渲染情况
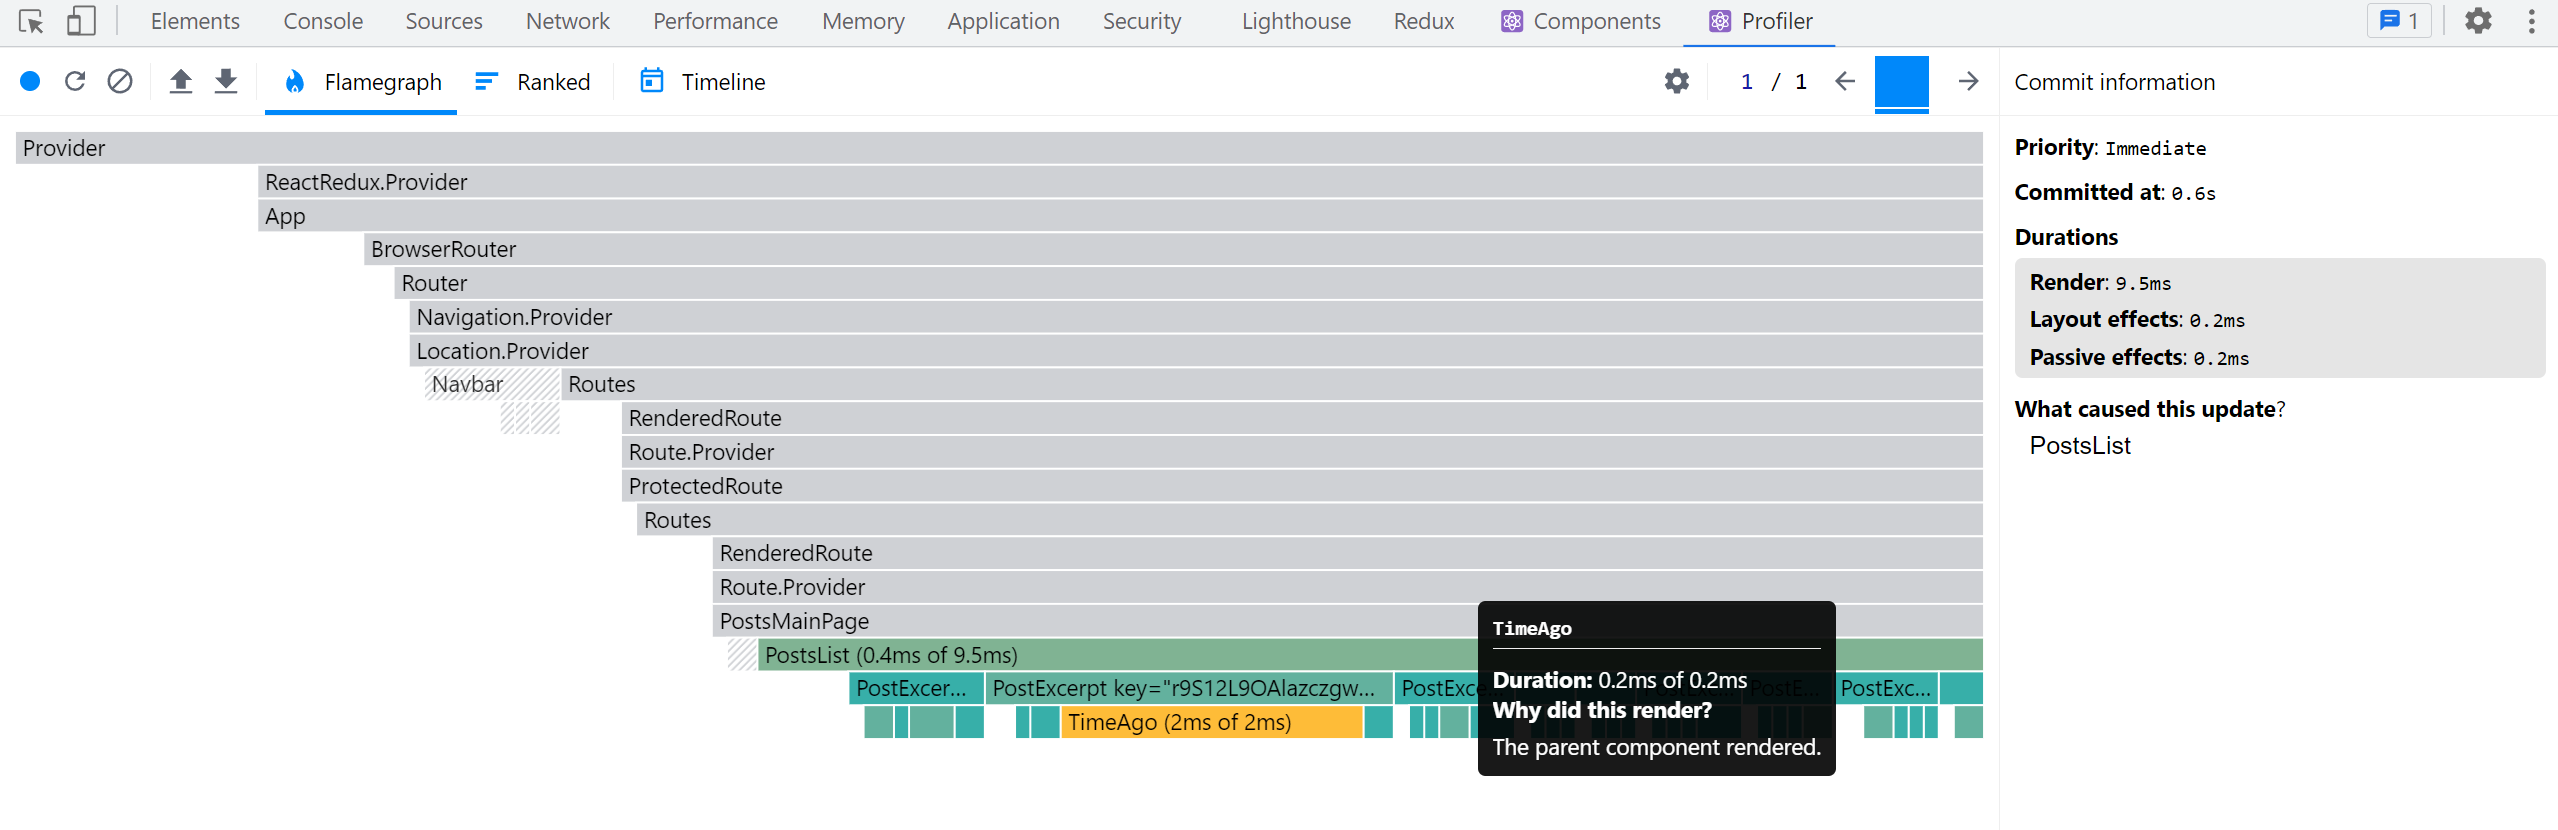
使用 React DevTools Profiler 查看状态更新后哪些组件重新渲染。尝试跳转到某个 <UserPage>。打开浏览器 DevTools,React "Profiler" 页签,点击左上圆形 Record 录制按钮。点击本应用的「刷新通知」按钮,停止录制。得到如下图:
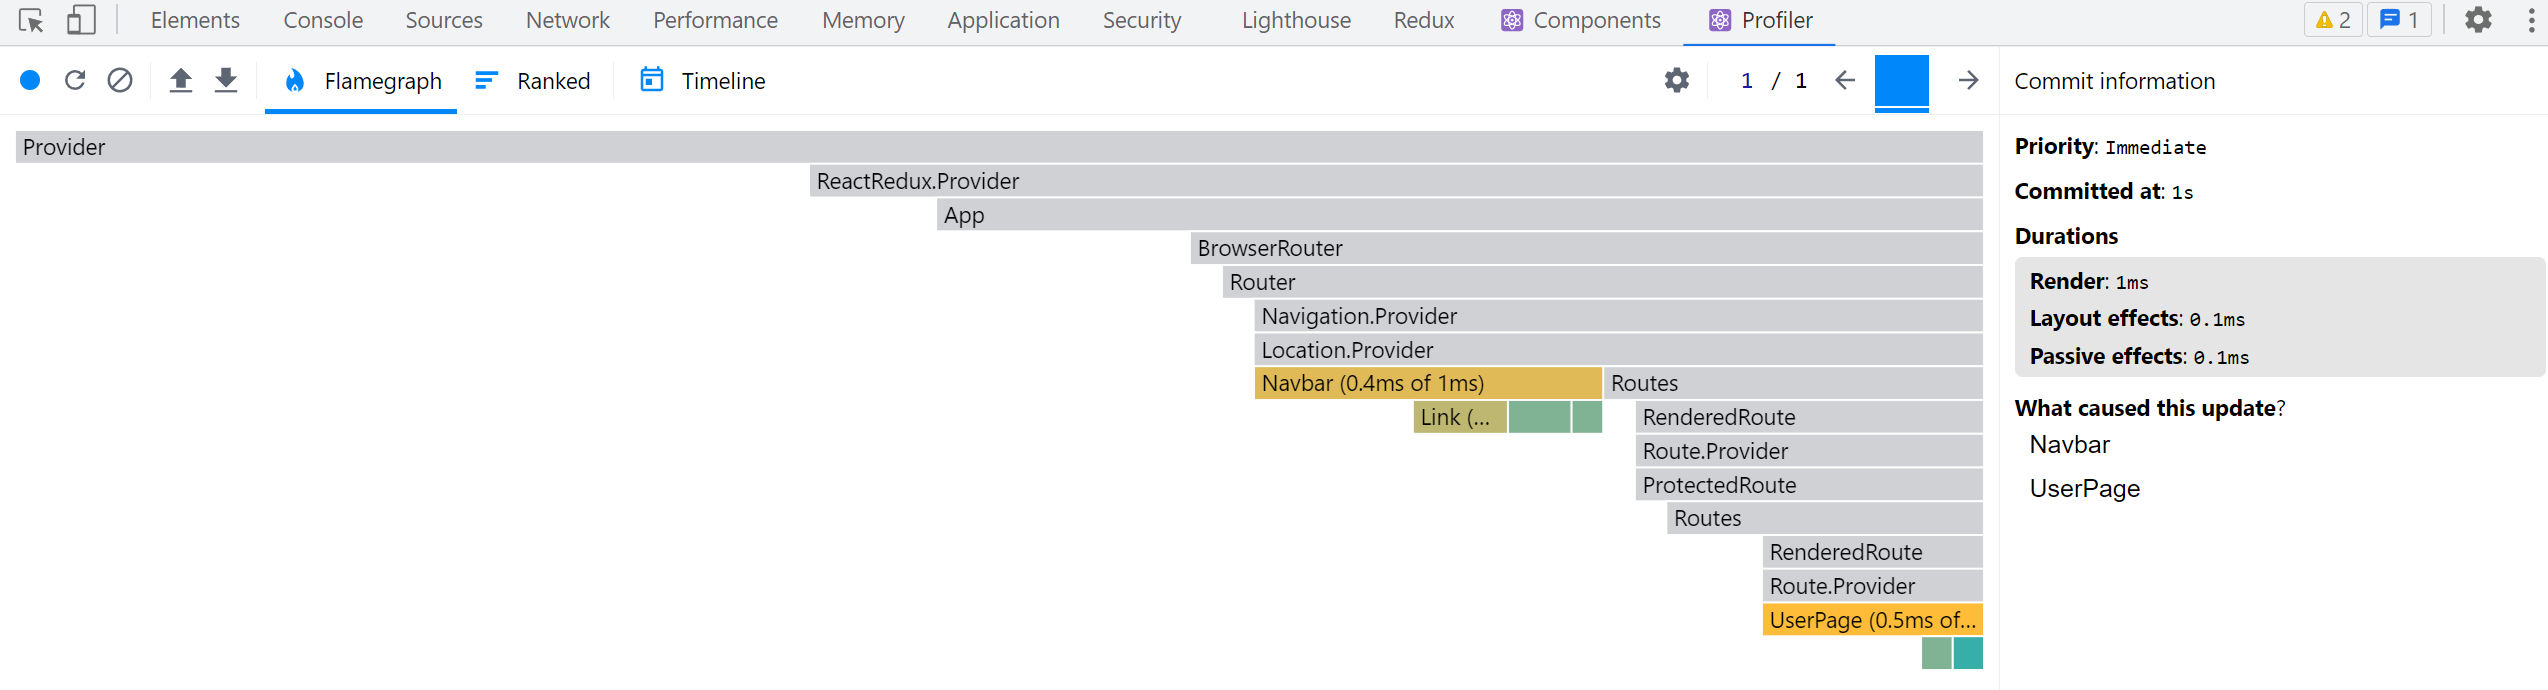
看到 <Navbar> 重新渲,合理,因为通知未读徽章发生变化。但为什么 <UserPage> 也重新渲染了?
打开 Redux DevTools,还原几条派发动作,只发现通知状态变更。<UserPage> 根本不读取通知,按理不会重渲染。这里输入组件或其使用的选择器有问题。
<UserPage> 用了 selectPostsByUser 读取该用户帖子。看 selectPostsByUser 职责里的问题:
export const selectPostsByUser = (state: RootState, userId: string) => {
  const allPosts = selectAllPosts(state)
  // ❌ 错误写法 - _每次_ 都创建一个新数组引用!
  return allPosts.filter(post => post.user === userId)
}
useSelector 每次派发动作会重新调用选择器,如果返回新引用值,组件会重渲。
这里调用了 filter(),返回的是 一个新数组引用。
所以 useSelector 每次都会返回新的数组引用,导致组件每次派发动作后无条件重渲。
这是 Redux应用中的典型错误。React-Redux 在开发环境会检测到此类选择器,然后在控制台输出警告:
Selector unknown returned a different result when called with the same parameters.
This can lead to unnecessary rerenders.
Selectors that return a new reference (such as an object or an array) should be memoized:
    at UserPage (http://localhost:5173/src/features/users/UserPage.tsx)
多数情况下,错误消息会标明具体选择器名称。这里因为 <UserPage> 里的选择器是匿名函数导致没有名称提示,但定位到 <UserPage> 里能排查。
针对本例,性能影响不大,组件简单且派发动作不多。但真实应用中,此类反复不必要的渲染可能严重拖慢体验,是常见性能问题,应及时处理。
记忆化选择器函数
理想情况是当 state.posts 或 userId 未变时,返回 同一 的数组引用,而非新数组。
这叫做**「记忆化」**:保存近期输入和结果,如果输入没变直接返回之前结果,不重复计算。
目前我们自己写选择器,仅用于复用读取 store 代码。若能让选择器记忆化就能提升性能。
Reselect 是专门为 Redux 设计的记忆化选择器库,提供 createSelector 函数,只会在输入改变时重新计算结果。Redux Toolkit 内置导出了 createSelector,我们已经可以直接用。
改写 selectPostsByUser 使其用 createSelector 记忆化:
import { createSlice, createAsyncThunk, createSelector } from '@reduxjs/toolkit'

// 省略 slice 代码

export const selectAllPosts = (state: RootState) => state.posts.posts

export const selectPostById = (state: RootState, postId: string) =>
  state.posts.posts.find(post => post.id === postId)

export const selectPostsByUser = createSelector(
  // 传入一个或多个「输入选择器」
  [
    // 复用已有选择器从根 state 读取需要的字段
    selectAllPosts,
    // 另一个选择器提取参数 userId 传递
    (state: RootState, userId: string) => userId
  ],
  // 输出函数接收输入选择器的返回值作为参数,输入改变时执行
  (posts, userId) => posts.filter(post => post.user === userId)
)
createSelector 接收一个输入选择器数组/参数和一个输出函数。
调用 selectPostsByUser(state, userId) 时,会调用输入选择器,取其结果作为输出函数输入,只有当输入改变才触发输出函数。
我们用了已有 selectAllPosts 取全部帖子数组,另写函数返回 userId,传给输出函数。
输出函数负责过滤属于该用户的帖子。
重复调用只会在 posts 或 userId 改变时计算,实现记忆化。
const state1 = getState()
// 第一次调用,执行输出函数
selectPostsByUser(state1, 'user1')
// 第二次调用,输入相同,跳过输出函数
selectPostsByUser(state1, 'user1')
// userId 变,执行输出函数
selectPostsByUser(state1, 'user2')

dispatch(fetchUsers())
const state2 = getState()
// posts 和 userId 未变,跳过输出函数
selectPostsByUser(state2, 'user2')

// 新增帖子
dispatch(addNewPost())
const state3 = getState()
// posts 更新,执行输出函数
selectPostsByUser(state3, 'user2')
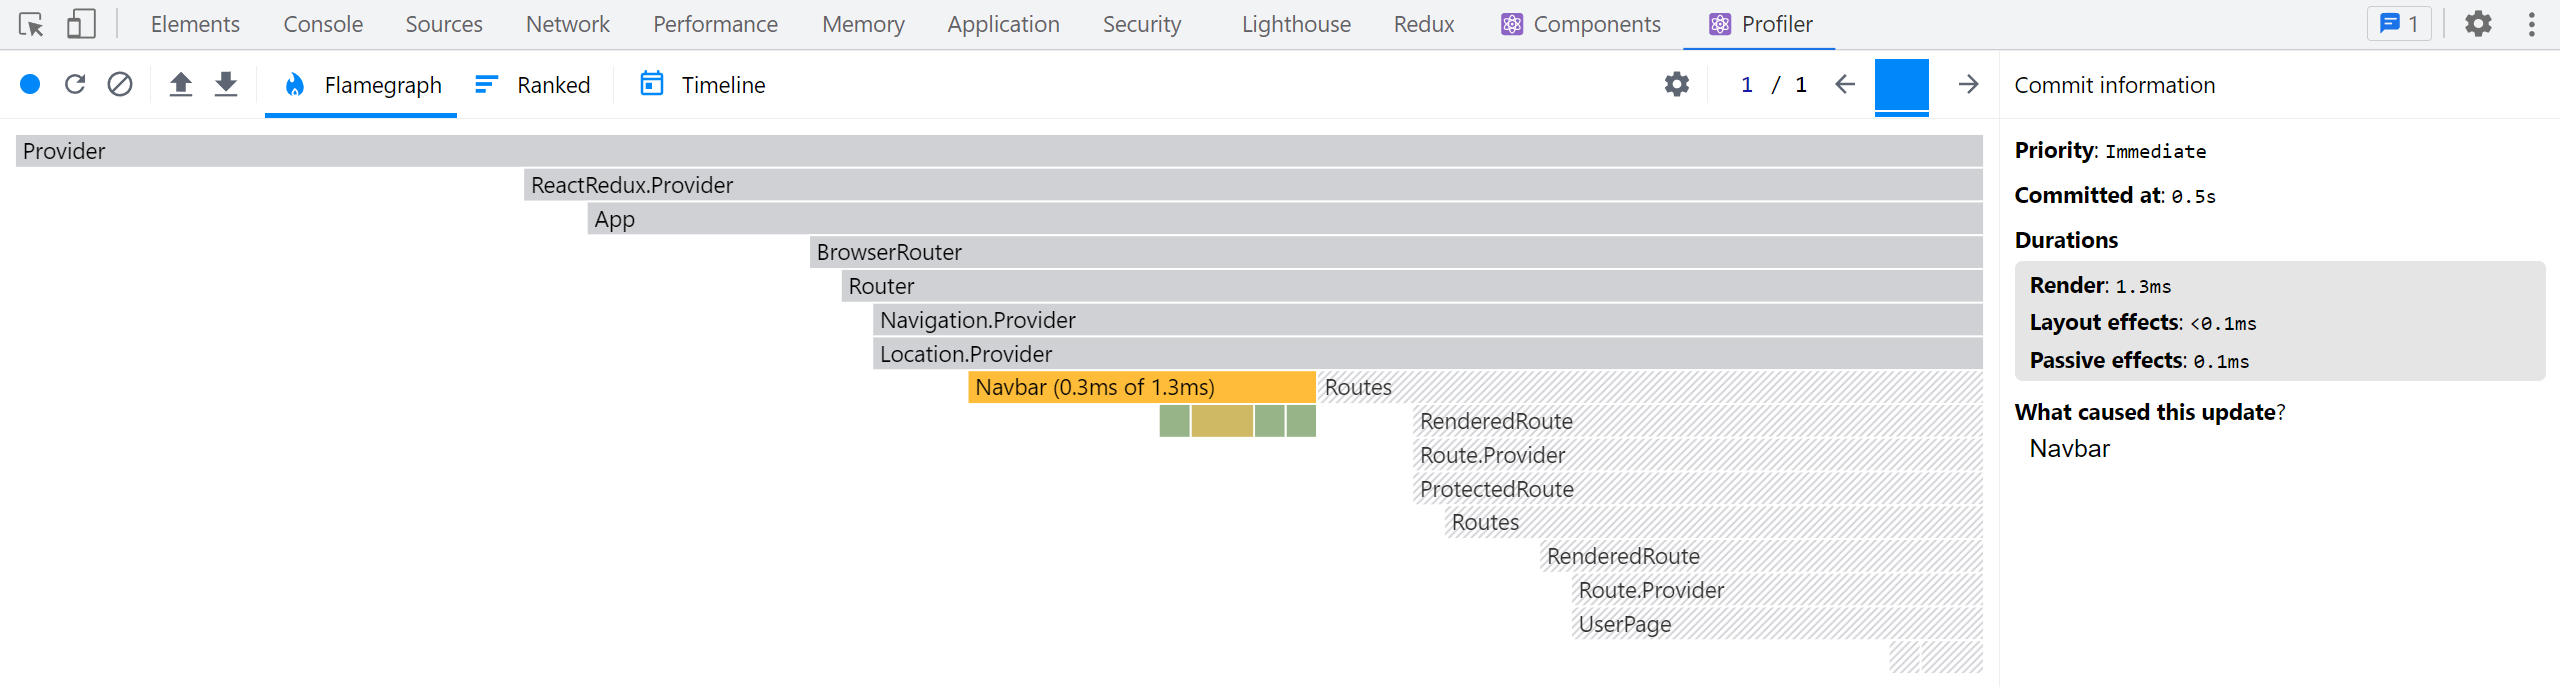
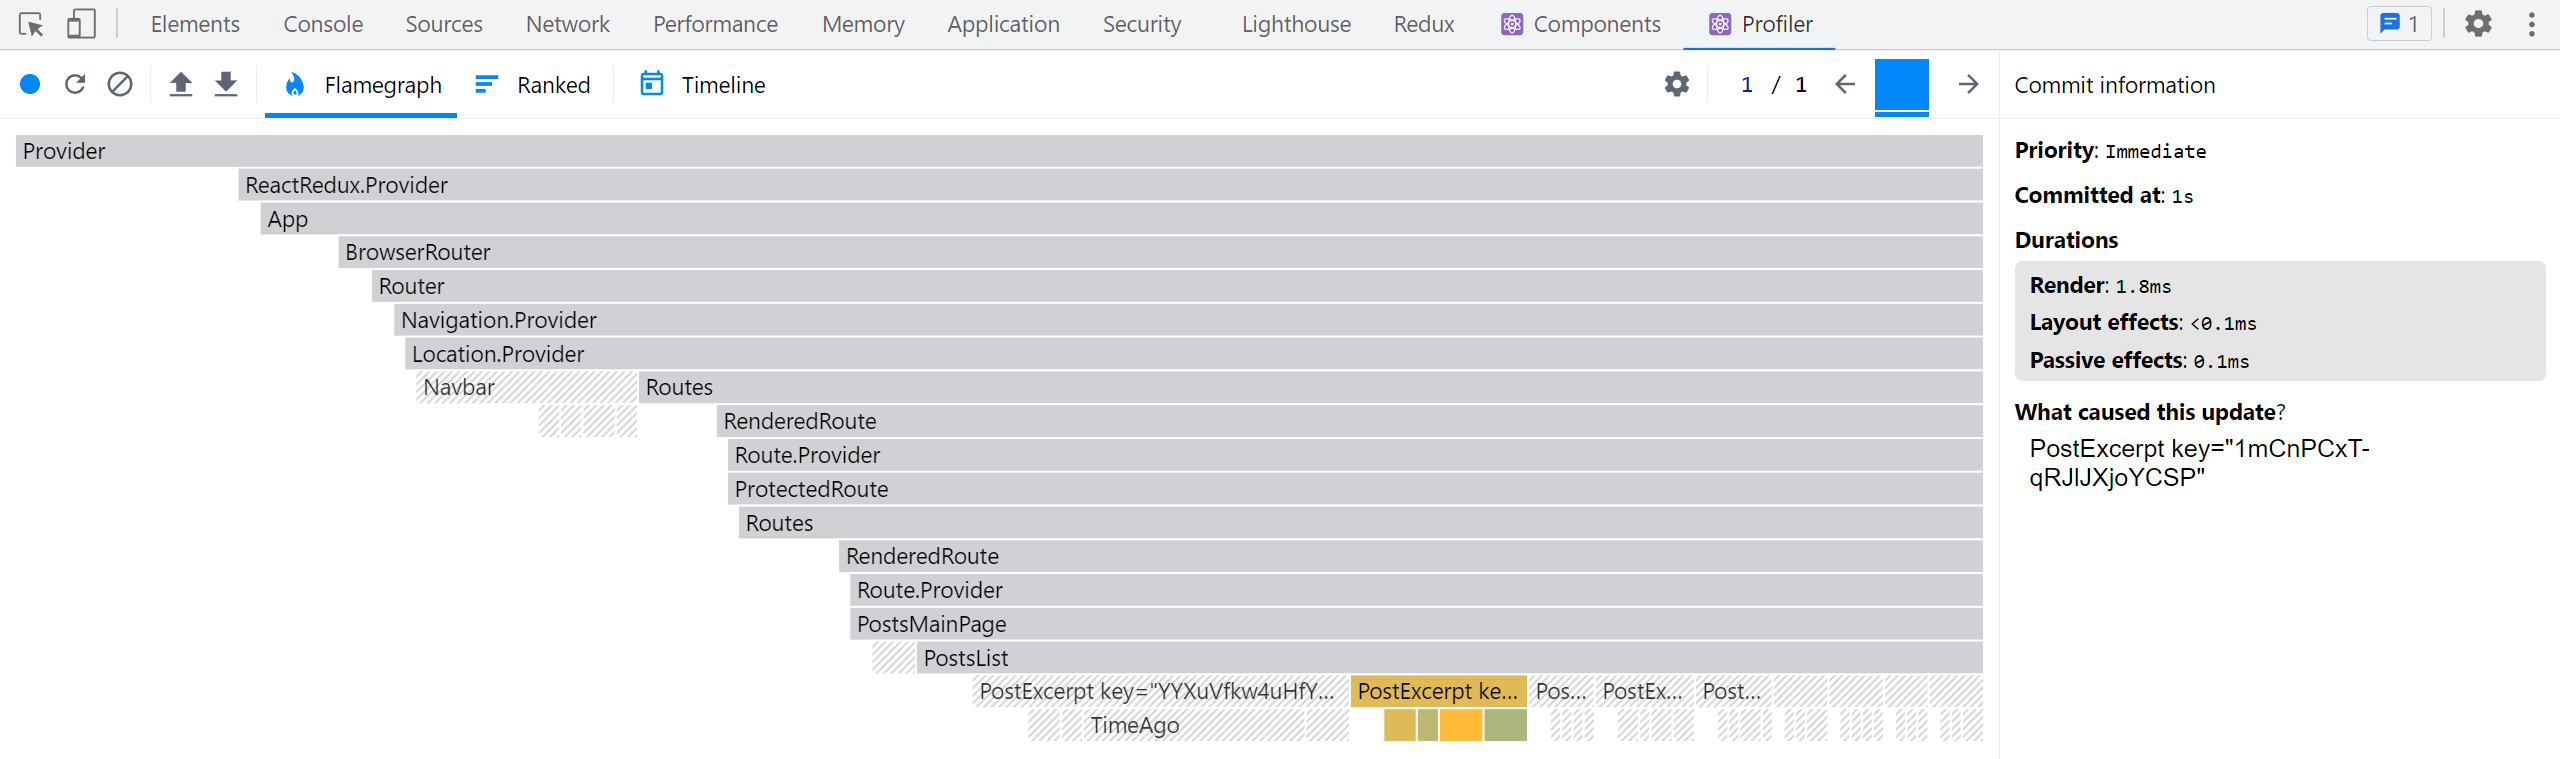
记忆化后,再用 React Profiler 捕获 <UserPage> 并刷新通知,这回 <UserPage> 不再重渲染:
选择器使用的平衡
记忆化选择器能显著提升 React+Redux App 性能,避免无谓重渲及浪费计算。
但并非所有选择器都需要记忆化! 我们以前写的绝大多数选择器都是普通函数,性能也够用。
记忆化仅当选择器返回新的对象或数组引用,或计算开销较大时才必需。
举例来看 selectUnreadNotificationsCount:
export const selectUnreadNotificationsCount = (state: RootState) => {
  const allNotifications = selectAllNotifications(state)
  const unreadNotifications = allNotifications.filter(
    notification => !notification.read
  )
  return unreadNotifications.length
}
它是普通函数,虽然做了 .filter(),但返回的是数字而非数组。数字类型不会频繁变化,比较安全。
当然,每次算未读条数有点浪费资源,加记忆化也合理,但重要性没有返回数组引用时高。
关于选择器函数和 Reselect 记忆化,参考:
调查帖子列表
返回 <PostsList>,点击某帖的反应按钮,同时捕获 React Profiler,会发现不只 <PostsList> 和改动的 <PostExcerpt> 渲染,所有 <PostExcerpt> 都重新渲染了:
为啥?只有一个帖子变化,为什么其它帖子也要重渲?
React 有默认行为:父组件渲染时,递归渲染其所有子组件!
修改帖子对象同时生成了新的帖子数组,<PostsList> 读取到新数组,于是重新渲染,之后 React 继续渲染所有 <PostExcerpt>。
小示例没啥性能问题,但真实场景大量长列表或组件树,很多额外渲染会拖慢性能。
列表渲染优化方案
有几种方案:
- 用
React.memo()包裹<PostExcerpt>,避免除非 props 改变才重渲。
试试:
let PostExcerpt = ({ post }: PostExcerptProps) => {
  // 省略逻辑
}

PostExcerpt = React.memo(PostExcerpt)
- 改写
<PostsList>让它只读取帖子 ID 列表,不再读取整个帖子数组。改<PostExcerpt>接收postId参数,并通过useSelector单独取帖子数据。若 ID 数组无变动,<PostsList>不会渲染,只改动的<PostExcerpt>触发渲染。
这稍复杂,因为需确保帖子数组按日期排序,无需每次在组件排序。可持续维护有序 ID 数组,并用记忆化选择器读取。
也可用 useSelector 自定义比较函数实现浅比较,如 useSelector(selectPostIds, shallowEqual)。
- 在 reducer 里维护额外的帖子 ID 数组,增删帖子才更新 ID 数组,搭配改写的
<PostsList>和<PostExcerpt>,实现只在 ID 数组变时渲染。
Redux Toolkit 提供了 createEntityAdapter,帮我们管理此类结构。
数据正规化
你会发现代码中不断通过 ID 字段查找条目。因数据存数组形式,查找时要用 array.find() 遍历直到找到该 ID。
虽说遍历很快,但如果数组有上百甚至上千条,性能损失会明显。我们需要直接根据 ID 快速查找,这叫**「正规化」**。
正规化状态结构
正规化状态包含:
- 同一条数据状态只保留一份,无重复
- 以查找表(key-value 结构)形式存储,key 是对象 ID,value 是对象内容。一般用 JS 普通对象实现。
- 可能还有包含所有 ID 的数组
JS 对象就是查找表,示例用户正规化状态:
{
  users: {
    ids: ["user1", "user2", "user3"],
    entities: {
      "user1": {id: "user1", firstName, lastName},
      "user2": {id: "user2", firstName, lastName},
      "user3": {id: "user3", firstName, lastName},
    }
  }
}
查找用户简易为:
const userId = 'user2'
const userObject = state.users.entities[userId]
用 createEntityAdapter 管理正规化状态
Redux Toolkit 的 createEntityAdapter 提供标准做法来将集合正规化为 {ids: [], entities: {}} 格式。它生成预设的 reducers 和选择器方便管理。
好处:
- 我们不用手写正规化管理代码
- 预置 reducer 支持常见操作:批量添加、更新单条、批量删除
- 可选排序函数
sortComparer,可保持 ID 数组排序且有序时才更新 ID 数组
createEntityAdapter 接收配置对象,支持带排序的比较函数(和 Array.sort() 一样用法)。
返回适配器对象包含:
- 预设 reducer 函数集合,也可用作
createSlice内部 reducer 的辅助工具 getInitialState(),返回初始正规化状态{ids: [], entities: {}},可传入额外字段合并getSelectors(),接受 selector 输入当前切片 root state,生成如selectAll和selectById选择器
将帖子切片正规化
按此思路重写 postsSlice,需改较多:
修改 PostsState,不再是 posts: Post[] 数组,而是扩展 Redux Toolkit 自带的 EntityState<Post, string> 类型的对象,同时保留 status 和 error。
导入 createEntityAdapter,创建与 Post 类型对应的适配器对象,同时指定排序规则(日期降序)。
import {
  createEntityAdapter,
  EntityState
  // 省略其它导入
} from '@reduxjs/toolkit'

// 省略 thunk

interface PostsState extends EntityState<Post, string> {
  status: 'idle' | 'pending' | 'succeeded' | 'rejected'
  error: string | null
}

const postsAdapter = createEntityAdapter<Post>({
  // 按日期降序排序
  sortComparer: (a, b) => b.date.localeCompare(a.date)
})

const initialState: PostsState = postsAdapter.getInitialState({
  status: 'idle',
  error: null
})


// 省略 thunk

const postsSlice = createSlice({
  name: 'posts',
  initialState,
  reducers: {
    postUpdated(state, action: PayloadAction<PostUpdate>) {
      const { id, title, content } = action.payload

      const existingPost = state.entities[id]

      if (existingPost) {
        existingPost.title = title
        existingPost.content = content
      }
    },
    reactionAdded(
      state,
      action: PayloadAction<{ postId: string; reaction: ReactionName }>
    ) {
      const { postId, reaction } = action.payload
      const existingPost = state.entities[postId]
      if (existingPost) {
        existingPost.reactions[reaction]++
      }
    }
  },
  extraReducers(builder) {
    builder
      // 省略其它 case
      .addCase(fetchPosts.fulfilled, (state, action) => {
        state.status = 'succeeded'
        // 用适配器函数填充帖子
        postsAdapter.setAll(state, action.payload)
      })
      .addCase(addNewPost.fulfilled, postsAdapter.addOne)
  }
})

export const { postAdded, postUpdated, reactionAdded } = postsSlice.actions

export default postsSlice.reducer

// 用适配器生成的选择器替代手写版本
export const {
  selectAll: selectAllPosts,
  selectById: selectPostById,
  selectIds: selectPostIds
  // 传入选择帖子切片的 selector
} = postsAdapter.getSelectors((state: RootState) => state.posts)

export const selectPostsByUser = createSelector(
  [selectAllPosts, (state: RootState, userId: string) => userId],
  (posts, userId) => posts.filter(post => post.user === userId)
)
拆解说明:
- 导入并调用
createEntityAdapter创建postsAdapter,其中指定排序函数把日期最新排前面 - 用
postsAdapter.getInitialState()生成基础规范化状态,同时传入{ status, error }合并 - reducer 里通过
state.entities[id]直接查找帖子实体,不用再数组遍历 - 接收到
fetchPosts.fulfilled后用postsAdapter.setAll填充状态,示范在createSlice里调用适配器 mutate 函数 - 接收到
addNewPost.fulfilled用适配器微调,直接传入postsAdapter.addOne作为 reducer 使用 - 替换我们写的
selectAllPosts和selectPostById为适配器自动生成的选择器,绑定state.posts访问路径 - 也导出
selectPostIds,组件可读取排序后的 ID 数组
还可以用 postsAdapter.updateOne 简化 postUpdated:
const postsSlice = createSlice({
  name: 'posts',
  initialState,
  reducers: {
    postUpdated(state, action: PayloadAction<PostUpdate>) {
      const { id, title, content } = action.payload
      postsAdapter.updateOne(state, { id, changes: { title, content } })
    },
    reactionAdded(
      state,
      action: PayloadAction<{ postId: string; reaction: ReactionName }>
    ) {
      const { postId, reaction } = action.payload
      const existingPost = state.entities[postId]
      if (existingPost) {
        existingPost.reactions[reaction]++
      }
    }
  }
  // 省略 extraReducers
})
注意 reactionAdded 无法用 updateOne 简单替代,因为它需要在嵌套字段计数器上做加法,而不是整体替换。那种复杂的变更依然可用对象可变写法。
优化帖子列表渲染
用 createEntityAdapter 后,更新 <PostsList>:
让它读取排序的帖子 ID 数组,<PostExcerpt> 传入 postId,再用选择器单独取对应帖子。
// 省略导入

import {
  fetchPosts,
  selectPostById,
  selectPostIds,
  selectPostsStatus,
  selectPostsError
} from './postsSlice'

interface PostExcerptProps {
  postId: string
}

function PostExcerpt({ postId }: PostExcerptProps) {
  const post = useAppSelector(state => selectPostById(state, postId))
  // 省略渲染逻辑
}

export const PostsList = () => {
  const dispatch = useAppDispatch()
  const orderedPostIds = useAppSelector(selectPostIds)

  // 省略其余状态读取和 effect

  if (postStatus === 'pending') {
    content = <Spinner text="Loading..." />
  } else if (postStatus === 'succeeded') {
    content = orderedPostIds.map(postId => (
      <PostExcerpt key={postId} postId={postId} />
    ))
  } else if (postStatus === 'rejected') {
    content = <div>{postsError}</div>
  }

  // 省略其它渲染
}
此时,如果点击帖子的反应按钮,在 React Profiler 里只看到改动的帖子组件渲染:
将用户切片正规化
同样思路应用到其他切片,例如 usersSlice:
代码简单,改动不多:
import {
  createSlice,
  createEntityAdapter
} from '@reduxjs/toolkit'

import { client } from '@/api/client'
import { createAppAsyncThunk } from '@/app/withTypes'

const usersAdapter = createEntityAdapter<User>()

const initialState = usersAdapter.getInitialState()

export const fetchUsers = createAppAsyncThunk('users/fetchUsers', async () => {
  const response = await client.get('/fakeApi/users')
  return response.users
})

const usersSlice = createSlice({
  name: 'users',
  initialState,
  reducers: {},
  extraReducers(builder) {
    builder.addCase(fetchUsers.fulfilled, usersAdapter.setAll)
  }
})

export default usersSlice.reducer

export const { selectAll: selectAllUsers, selectById: selectUserById } =
  usersAdapter.getSelectors((state: RootState) => state.users)

export const selectCurrentUser = (state: RootState) => {
  const currentUsername = selectCurrentUsername(state)
  if (!currentUsername) {
    return
  }
  return selectUserById(state, currentUsername)
}
由于只有替换整张用户列表,所以用 usersAdapter.setAll 简单实现。
替换了以前手写的 selectAllUsers 和 selectUserById 为自动生成版本。
类型上稍有出入,selectUserById 不能输入 null,加检查即可。
将通知切片正规化
最后我们也给通知切片用适配器:
import { createEntityAdapter, createSlice } from '@reduxjs/toolkit'

import { client } from '@/api/client'

// 省略类型与 fetchNotifications thunk

const notificationsAdapter = createEntityAdapter<ClientNotification>({
  // 按日期降序排序
  sortComparer: (a, b) => b.date.localeCompare(a.date)
})

const initialState = notificationsAdapter.getInitialState()

const notificationsSlice = createSlice({
  name: 'notifications',
  initialState,
  reducers: {
    allNotificationsRead(state) {
      Object.values(state.entities).forEach(notification => {
        notification.read = true
      })
    }
  },
  extraReducers(builder) {
    builder.addCase(fetchNotifications.fulfilled, (state, action) => {
      // 添加客户端元数据追踪新通知
      const notificationsWithMetadata: ClientNotification[] =
        action.payload.map(notification => ({
          ...notification,
          read: false,
          isNew: true
        }))

      Object.values(state.entities).forEach(notification => {
        // 已读则不再标记为新
        notification.isNew = !notification.read
      })

      notificationsAdapter.upsertMany(state, notificationsWithMetadata)
    })
  }
})

export const { allNotificationsRead } = notificationsSlice.actions

export default notificationsSlice.reducer

export const { selectAll: selectAllNotifications } =
  notificationsAdapter.getSelectors((state: RootState) => state.notifications)

export const selectUnreadNotificationsCount = (state: RootState) => {
  const allNotifications = selectAllNotifications(state)
  const unreadNotifications = allNotifications.filter(
    notification => !notification.read
  )
  return unreadNotifications.length
}
同样导入 createEntityAdapter,调用适配器生成状态初始值。
有若干地方遍历通知更新,此时要用 Object.values(state.entities) 拿到实体数组。
用 notificationsAdapter.upsertMany 替代之前的增量更新。
编写响应式逻辑
到此为止,我们的应用行为都相当命令式。用户操作(发帖、拉取通知)调用动作,组件内用 useEffect 或点击事件处理器响应派发。这包括数据异步请求 thunk。
不过,有时需要写更多响应应用中特定事件或动作派发的逻辑。
我们在帖子加载时显示过加载指示。希望给用户增加发帖成功时的视觉反馈,比如弹出消息提示。
之前看到多个 reducer 可同时处理同一动作更新 state。但如果逻辑涉及异步或副作用,不能放 reducer。Reducer 必须是「纯函数」,绝不可有副作用。
不能放 reducer,我们能放哪?
答案是放进 Redux 中间件,专门用以处理副作用。
用 createListenerMiddleware 实现响应式逻辑
之前用过异步 thunk 中间件处理「立即执行」的异步逻辑,但 thunk 只是个函数,不是响应动作派发的「监听」。
Redux Toolkit 提供 createListenerMiddleware,允许我们定义「监听器」,监听某动作并执行额外逻辑。
它类似 React 里的 useEffect 钩子,不过作用于 Redux 层面,响应动作派发和状态更新,而不是组件渲染周期。
设置监听中间件
Thunk 中间件自动注入,监听中间件就要定义和添加到 store。
在新文件 app/listenerMiddleware.ts 创建中间件:
import { createListenerMiddleware, addListener } from '@reduxjs/toolkit'
import type { RootState, AppDispatch } from './store'

export const listenerMiddleware = createListenerMiddleware()

export const startAppListening = listenerMiddleware.startListening.withTypes<
  RootState,
  AppDispatch
>()
export type AppStartListening = typeof startAppListening

export const addAppListener = addListener.withTypes<RootState, AppDispatch>()
export type AppAddListener = typeof addAppListener
createListenerMiddleware 返回对象包含:
.middleware:真正需要添加到 store 的中间件.startListening:添加监听器.addListener:也可以派发动作形式动态添加监听器
使用 .withTypes() 包装,生成带类型参数的辅助函数。
然后,在 store.ts 把监听中间件加进中间件链:
import { configureStore } from '@reduxjs/toolkit'

import authReducer from '@/features/auth/authSlice'
import postsReducer from '@/features/posts/postsSlice'
import usersReducer from '@/features/users/usersSlice'
import notificationsReducer from '@/features/notifications/notificationsSlice'

import { listenerMiddleware } from './listenerMiddleware'

export const store = configureStore({
  reducer: {
    auth: authReducer,
    posts: postsReducer,
    users: usersReducer,
    notifications: notificationsReducer
  },
  middleware: getDefaultMiddleware =>
    getDefaultMiddleware().prepend(listenerMiddleware.middleware)
})
configureStore 默认已经带了 thunk 及开发环境安全检查。我们想保持它们,同时把监听中间件加到最前端。
中间件是链式结构,如 m1 -> m2 -> m3 -> store.dispatch()。监听中间件需要放最开始,预先捕获动作执行。
getDefaultMiddleware() 返回数组,有 .prepend() 方法可往前添加。
新发帖弹出吐司提示
监听中间件配置好后,添加监听器,监听成功添加新帖动作,弹出吐司消息。
我们用已安装的 react-tiny-toast 库,无需安装。要在 <App> 里导入 <ToastContainer> 渲染:
import React from 'react'
import {
  BrowserRouter as Router,
  Route,
  Routes,
  Navigate
} from 'react-router-dom'
import { ToastContainer } from 'react-tiny-toast'

// 省略导入与 ProtectedRoute

function App() {
  return (
    <Router>
      <Navbar />
      <div className="App">
        <Routes>{/* 省略路由内容 */}</Routes>
        <ToastContainer />
      </div>
    </Router>
  )
}
给 postsSlice 添加监听器:
import {
  createEntityAdapter,
  createSelector,
  createSlice,
  EntityState,
  PayloadAction
} from '@reduxjs/toolkit'
import { client } from '@/api/client'

import type { RootState } from '@/app/store'
import { AppStartListening } from '@/app/listenerMiddleware'
import { createAppAsyncThunk } from '@/app/withTypes'

// 省略类型、初始状态、切片定义和选择器

export const selectPostsStatus = (state: RootState) => state.posts.status
export const selectPostsError = (state: RootState) => state.posts.error

export const addPostsListeners = (startAppListening: AppStartListening) => {
  startAppListening({
    actionCreator: addNewPost.fulfilled,
    effect: async (action, listenerApi) => {
      const { toast } = await import('react-tiny-toast')

      const toastId = toast.show('New post added!', {
        variant: 'success',
        position: 'bottom-right',
        pause: true
      })

      await listenerApi.delay(5000)
      toast.remove(toastId)
    }
  })
}
添加监听器时,调用 startAppListening,传入对象:
actionCreator:指定监听的动作(此处是 thunk 完成动作addNewPost.fulfilled)effect:执行回调,接收匹配动作和listenerApi对象
effect 支持同步异步。listenerApi 提供 dispatch、getState 及更多辅助异步功能。
这里动态导入 toast 库,调 show 弹出成功提示,等待 5 秒后移除提示。
为避免切片文件导入监听文件导致循环依赖,我们把监听器导出成函数,留给监听文件调用。监听文件导入切片的监听工厂函数,调用它注册监听:
import { createListenerMiddleware, addListener } from '@reduxjs/toolkit'
import type { RootState, AppDispatch } from './store'

import { addPostsListeners } from '@/features/posts/postsSlice'

export const listenerMiddleware = createListenerMiddleware()

export const startAppListening = listenerMiddleware.startListening.withTypes<
  RootState,
  AppDispatch
>()
export type AppStartListening = typeof startAppListening

export const addAppListener = addListener.withTypes<RootState, AppDispatch>()
export type AppAddListener = typeof addAppListener

// 调用切片的监听添加函数并传入注册函数
addPostsListeners(startAppListening)
这样,添加新帖子后会在页面右下角弹出绿色提示,5 秒后消失。监听中间件拦截动作执行回调,组件本身无须改动。
你学到了什么
本节我们做了大量新功能。成品示例如下:
总结:
- 记忆化选择器函数能优化性能
- Redux Toolkit 重新导出 Reselect 的
createSelector,可生成记忆化选择器 - 记忆化选择器仅在输入选择器返回值变化时重新计算
- 记忆化可跳过贵重计算,保证返回相同引用
- Redux Toolkit 重新导出 Reselect 的
- 有多种模式可以优化 React+Redux 组件渲染
- 避免在
useSelector中创建新引用的对象/数组,防止无谓重渲 - 传入记忆化选择器到
useSelector以优化性能 useSelector可以传入自定义比较函数如shallowEqual替代默认引用判断- 用
React.memo()包裹组件,只在 props 变化时渲染 - 列表渲染优化:父列表只选 ID 数组,传 ID 给子组件,子组件通过 ID 单独读取数据
- 避免在
- 正规化状态结构推荐存储实体数据
- 「正规化」即无数据重复,实体存储在以 ID 为键的映射表中
- 结构类似
{ids: [], entities: {}}
- Redux Toolkit 的
createEntityAdapter助力正规化切片管理- ID 可以用排序函数定序,只有更改时更新
- 适配器对象包含:
adapter.getInitialState可合并额外加载状态字段- 常用 reducer:
setAll,addMany,upsertOne,removeMany adapter.getSelectors生成选择器如selectAll,selectById
- Redux Toolkit 的
createListenerMiddleware用于响应动作派发执行逻辑- 中间件需添加到 store,带入类型参数
- 监听器多定义在切片文件,也可其它方式拆分
- 监听匹配单个动作、多动作或自定义条件
- 监听回调支持同步异步多样逻辑
listenerApi提供额外辅助方法管理复杂异步工作流
接下来是什么?
Redux Toolkit 还包含功能强大的数据获取与缓存 API——「RTK Query」。RTK Query 是一个可选扩展,能帮你彻底免写数据获取逻辑。
在 第7部分:RTK Query 基础 你将学习 RTK Query 的原理、解决的问题,以及如何使用它在应用中高效获取和缓存数据。